Picture this: You had a brilliant idea for a brand-new recipe, whipped it up in your kitchen, and now you’re ready to share the recipe with the world on your food blog. But wait! You forgot a critical step – recipe testing!
Recipe testing is one of the most important parts of recipe development. While it may sometimes feel tedious, frustrating, or repetitive, it’s a necessary step to produce high-quality, consistent, and trustworthy recipes.

What is recipe testing?
Recipe testing is the process of repeatedly making a recipe to perfect it and ensure that it is foolproof for your readers to recreate in their own homes.
Recipe testing is also a great way to provide you with feedback during the recipe development process and can provide answers to questions like:
- Does this curry recipe need more spice?
- Does this cake need to bake at a lower temperature or in a different pan?
- Would these cookies be better if they were smaller?
- Should the chicken in these enchiladas be baked, grilled, or pan-seared?
- Are my recipe instructions clear enough for my readers to follow? Do I need to be more specific?
- Etc., etc., etc.
Why is recipe testing important?
Instead of making a recipe just once before posting it on your blog, thorough recipe testing ensures that your readers will get a consistent, delicious final product every time they make your recipe (as long as they follow the recipe closely!).

Properly testing your recipes helps ensure that you are a credible resource for your readers. While some un-tested recipes might happen to turn out well for readers, that may not always be the case. Recipe testing serves as quality control by helping to prevent unnecessary bad reviews and keeping readers of all skill levels coming back to you time and time again for recipes.
Chefs, cookbook authors, food bloggers, and many others working in the food industry rely on recipe testing as part of their recipe development process.
How do you test recipes?
When you make your recipe for the first time, write down every ingredient, measurement, and direction as clearly as possible. Once you’ve finished the first run-through, ask yourself:
- What worked well in this recipe?
- What could be better?
- What changes can I make in the next version?
- Ingredients?
- Quantities of ingredients?
- Cooking method or temperature?
- Directions?
- Equipment?
It is critical to only change one ingredient or method at a time when recipe testing. This helps you determine exactly what effect the change is having on the final product.
Repeat this process as many times as needed until you are satisfied with the result. Which brings us to our next question…
How many times should you test a recipe?
This question will vary widely depending on the type of recipe, but it is best to test a recipe a minimum of two times. Even if a recipe is a tried-and-true family favorite, recipe testing ensures that your ingredient measurements and directions are as precise as possible. And, who knows, you may even discover a way to make the recipe even better through your recipe testing process!
Certain types of recipes will require more testing than others, and generally, the more complex the process, and the longer the ingredient list, the more thorough you will need to be in your testing process. For example, a cocktail recipe might only require two tests before it is perfected, while a recipe for a layer cake with homemade frosting might require 5+ run-throughs!
High-quality recipe content takes longer to create, but will benefit you both from a brand loyalty and SEO perspective (and hopefully you’ll feel better about putting it out into the world, too!). Google wants to provide users with the most helpful, easy-to-follow, and dependable recipes and rewards websites that meet those criteria by potentially ranking them higher on the search engine results page. Recipe testing is a great way to ensure that you’re creating the type of content that search engines prefer.
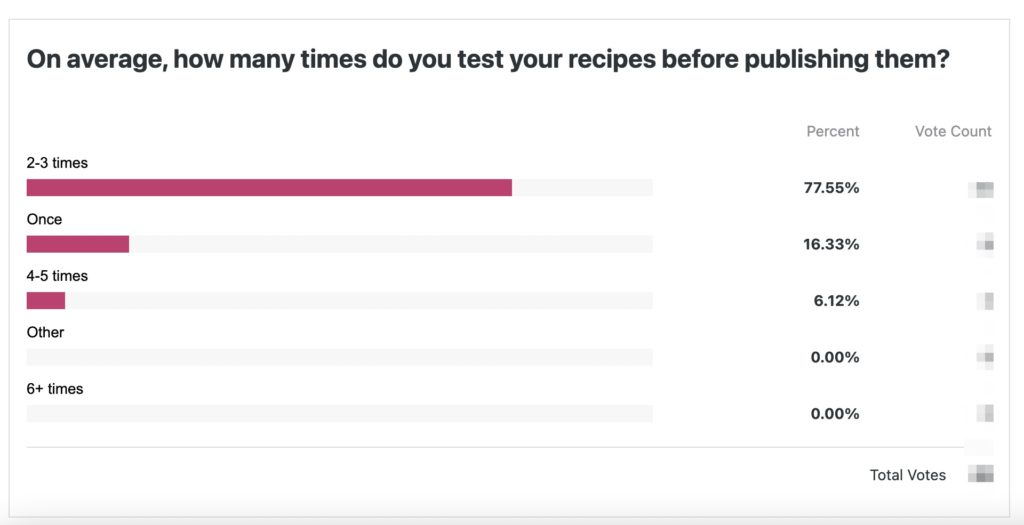
We asked our Food Blogger Pro members how many times they usually test a recipe before publishing, and you can see that the vast majority test each recipe 2-3 times on average.

The longer you are developing recipes, the more you will find a routine that works for you!
Recipe testing best practices
- Test each recipe at least 2-4 times.
- For each test, change only one ingredient or step at a time. This allows you to determine exactly what effect each change has.
- I.e. change the type of flour in one test, and the amount of flour in the next test.
- Write down everything (including observations from the cooking process).
- Document every change you make to the recipe.
- Take notes as you cook if anything in the recipe requires more detail or clarity.
- How finely should you chop the onion?
- Enlist taste testers!
- Try to find taste testers with a variety of preferences – everyone has different levels of spice, salt, sweet, etc. that they prefer.
- Ask your friends, family, coworkers, neighbors – anyone goes!
- Consider having someone else prepare the recipe in their home kitchen.
- Could they find all of the ingredients listed in the recipe?
- Were your instructions clear and easy to follow?
- Did their final product look and taste the same as yours?
- Bonus: test recipes in different kitchens with different appliances/cookware.
- If you live at a high altitude, it would be best to have someone test the recipe at a lower altitude to see if you need to make any adjustments.
Additional recipe testing resources
Last but not least, we wanted to share some other recipe testing resources that we love with you:
- Sally’s Baking Addiction’s Recipe Testing blog posts
- Well Plated’s detailed The Making of a Cookbook: Recipe Testing blog post
- A Duck’s Oven Cookbook Lab Chronicles, Episode 5: Recipe Testing for Book vs. Blog
- Dorie Greenspan’s Making a cookbook: Recipe testing newsletter
That wraps-up our Recipe Testing 101 blog post! We hope you learned something new and that you can apply these tips to your next recipe development project.
We’d love to hear from you… what does your recipe testing process look like?
Recipe testing goes a long way in knowing what works compared to what doesn’t. Working alongside a group can be especially useful here, too.
It makes such a huge difference! LOVE the idea of testing with a group as well.
Thanks for reading, Carola! 🙂